Many homeowners want to upgrade their kitchen quickly and affordably, and installing a backsplash is an excellent way to do just that. By following a straightforward process, you can protect your walls from moisture and stains while enhancing your kitchen’s style. Whether you choose peel-and-stick tiles or traditional ceramic options, this project is manageable for beginners and can typically be completed in a weekend. With the right tools and some careful planning, you’ll achieve a polished, professional look that adds lasting value to your home.
Choosing the Right Backsplash

Before starting your backsplash project, it’s important to select a style and material that fits both your kitchen’s look and your lifestyle. Since this upgrade protects your walls from moisture and stains while enhancing appeal, you want a backsplash that balances aesthetics with practicality. Whether you prefer a quick peel-and-stick solution or traditional ceramic tiles, understanding your options will help you achieve a professional look without overspending or prolonging the installation.
Materials to Consider
Materials for backsplashes vary widely, and your choice will affect durability, ease of installation, and cost. Peel-and-stick tiles offer a budget-friendly, renter-friendly option that you can install in just a few hours. Traditional ceramic or mosaic tiles, while slightly more involved, provide long-lasting protection and a classic look. You’ll need appropriate adhesives or thin-set mortar depending on your choice, so factor in the material compatibility with your wall surface and your skill level.
Design and Color Options
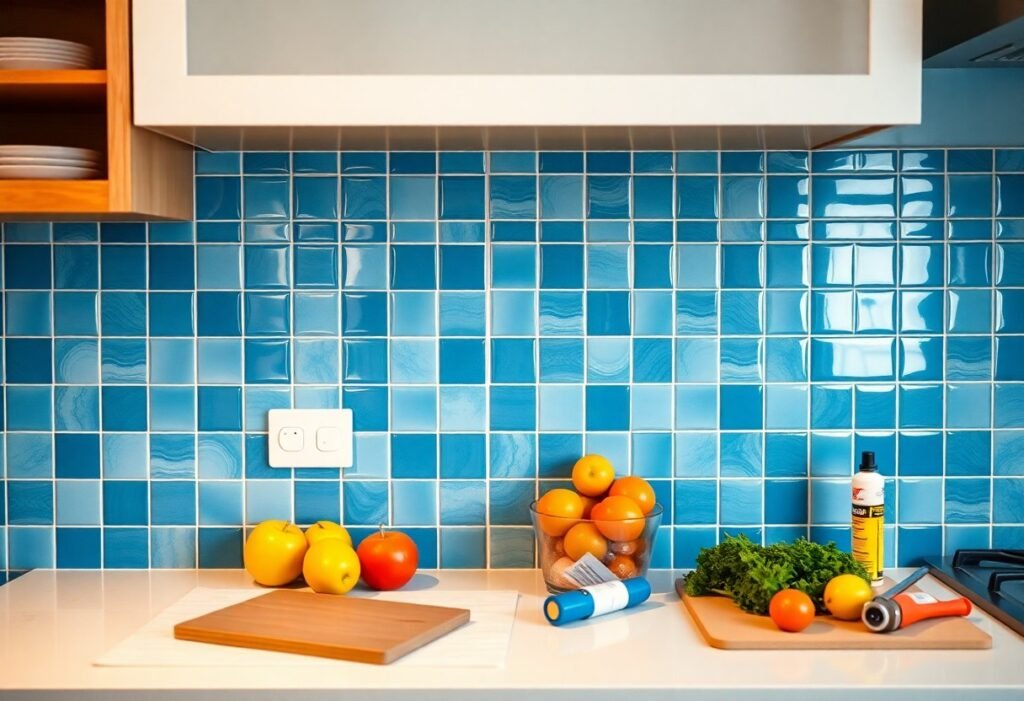
To create a backsplash that complements your kitchen, consider the colors and patterns that match your cabinetry, countertops, and overall style. Neutral tones offer versatility and make your kitchen appear bright and spacious, while bold colors add personality and become a focal point. Patterns from classic subway tiles to intricate mosaics allow you to express your taste, even within a limited budget and timeframe.
For instance, if your kitchen features white cabinets and quartz countertops, soft gray subway tiles can enhance the clean, modern feel. Alternatively, vibrant mosaic tiles can add a pop of color and texture to a simpler, minimalist kitchen. Since this project typically takes 4–8 hours, you can experiment with smaller sample tiles before committing to a full design, ensuring the end result matches your vision perfectly.
Tools and Materials Needed
Some vital tools and materials will make your backsplash installation smooth and efficient. Whether you choose peel-and-stick tiles or traditional ceramic ones, you’ll need items like adhesive, grout, spacers, and safety gear. To get a better idea of the process, check out Easiest Tile Backsplash I’ve Ever Done | Church Flip | Episode 6 for helpful visual guidance before you start.
Essential Tools for Installation
With basic tools like a notched trowel, tile cutter or utility knife, level, measuring tape, and tile spacers, you’ll handle most of the work yourself. Safety gloves and goggles protect you during cutting or adhesive application. Having these at hand helps your project stay on track, making a weekend installation both manageable and satisfying.
Recommended Products
Assuming you want results that are affordable yet durable, peel-and-stick tiles are perfect for quick installs, while ceramic or mosaic tiles offer a more traditional and long-lasting option. Look for quality grout, sealants, and tile adhesive designed for kitchen use to ensure your backsplash stands up to moisture and stains.
Recommended products include tile cutter bundles for precision cuts, peel-and-stick tile kits for renters or beginners, and professional-grade grout and sealants available on Amazon. These choices help you balance budget and quality, making your upgrade both cost-effective and visually appealing.
Preparing the Wall Surface
If you want your backsplash to adhere properly and look professional, preparing the wall surface is key. This means making sure the area is clean, dry, and free from grease or debris. Whether you’re applying peel-and-stick tiles or traditional ceramic ones, a smooth wall will help ensure even placement and long-lasting results. Taking the time to prepare your surface carefully can save you from future problems like peeling tiles or uneven grout lines.
Cleaning and Smoothing the Area
With the wall clear of dust, grease, and moisture, you set the stage for perfect tile adhesion. Use a mild detergent and warm water to clean the surface thoroughly, then wipe it dry with a cloth. If the wall has any bumps or rough spots, lightly sand them to create smoothness. This step helps your tiles lay flat and reduces the risk of uneven spacing or tiles popping off later.
Measuring and Planning Your Layout
To achieve a balanced and attractive backsplash, start by measuring your wall area accurately and calculate how many tiles you’ll need, adding an extra 10% for cuts or mistakes. Plan your tile placement to minimize cuts and align patterns neatly, especially around outlets and corners. A thoughtful layout eliminates waste and ensures your finished backsplash looks seamless and well-designed.
Measuring your space carefully before you begin allows you to visualize how the tiles will fit and helps prevent surprises during installation. Use a level and measuring tape to mark guide lines, ensuring each row stays straight. By mapping out your tile arrangement in advance, you can adjust the pattern for symmetry and plan cuts around obstacles, making your DIY project more efficient and professional-looking.
Installation Process
Now that you have your materials ready, start by measuring and preparing your wall. Clean and dry the surface thoroughly for the best adhesion. Follow your layout plan carefully to make sure tiles align perfectly. Whether you choose peel-and-stick or traditional tiles, apply them steadily, cutting as needed around outlets and corners. If you want to see how others have managed their first project, check out this First timer tile backsplash complete! : r/DIY for inspiration and tips.
Applying Peel-and-Stick Tiles
There’s a simple charm in peel-and-stick tiles for quick upgrades. Just peel off the backing and press the tile firmly onto your prepared wall. This option is perfect if you’re renting or want a fast, mess-free project. Unlike traditional tiles, no adhesive or grout is needed, and you can finish installing your backsplash in just a few hours.
Installing Traditional Tiles with Adhesive
For a more durable and permanent backsplash, spread tile adhesive evenly using a notched trowel. Press each tile firmly into place with your chosen spacers to maintain a clean gap. Allow the adhesive to set before grouting. Though this takes more time, the results offer a professional look and lasting protection.
Plus, installing traditional tiles allows you to customize patterns and materials more extensively. While it requires additional steps like grout application and sealing, the process helps you develop valuable skills. Using tools like a tile cutter and a level ensures a precise finish, making your kitchen backsplash both beautiful and resilient.
Grouting and Finishing Touches
Many homeowners find that grouting and finishing touches bring the backsplash project to completion with a professional look. After your tiles set, applying grout fills the gaps and adds durability, while cleaning off excess grout and sealing protect against moisture and stains. Caulking where the backsplash meets the countertop ensures a clean, polished edge that resists water damage. With simple tools and a bit of patience, you can enhance your kitchen’s appeal and protection in just a few hours.
Grouting Techniques
If you’re working with traditional ceramic or mosaic tiles, applying grout carefully is necessary to achieve smooth, even joints. Use a rubber float to press grout into the spaces between tiles, holding it at a 45-degree angle and working diagonally. Avoid removing too much grout during cleaning to keep the joints strong. Take your time to minimize mess and ensure consistent coverage for a neat finish that strengthens and beautifies your backsplash.
Cleaning and Sealing
One important step after grouting is cleaning excess grout before it fully hardens to avoid a hazy residue. Use a damp sponge to gently wipe the tiles, rinsing frequently to keep the surface clean. Once dry, apply a grout sealer to protect against stains and moisture. This simple step extends your backsplash’s lifespan and keeps it looking fresh, especially in busy kitchens where splashes are common.
A well-sealed backsplash prevents water and cooking spills from seeping into grout and backing, reducing the risk of mold or damage. By investing time in thorough cleaning and sealing, you maintain your kitchen’s beauty and hygiene, ensuring your upgrade lasts many years with minimal upkeep.
Tips for Success
To ensure your backsplash installation goes smoothly, follow these key tips:
- Measure carefully and add a 10% overage to cover mistakes or cuts.
- Use spacers to keep tiles evenly spaced and aligned.
- Choose peel-and-stick tiles for quicker, renter-friendly projects.
- Wear safety gloves and goggles when cutting tiles or using adhesive.
Any attention to detail at each step will help you achieve a polished, professional-looking backsplash that enhances your kitchen’s appeal.
Common Mistakes to Avoid
One of the most common mistakes is starting without properly preparing your wall surface, which can lead to poor tile adhesion and bubbles. Avoid rushing your layout planning; failing to align tiles properly or not accounting for outlets can cause uneven looks and frustration. Skipping the grout sealing step can allow moisture to damage your backsplash over time. Taking your time to avoid these errors will ensure a longer-lasting and visually pleasing finish.
Final Touch-Up Tips
The finishing steps bring your backsplash to life.
- Clean off excess grout promptly to prevent hardened residue.
- Apply caulk along edges where the backsplash meets the countertop to prevent water seepage.
- Use a sealant over grout for added protection.
- Polish tiles with a soft cloth for extra shine.
Knowing these final touches improves both the durability and look of your backsplash, completing your weekend project beautifully.
Final touch-up steps are imperative to ensure your backsplash stands up to everyday kitchen use and looks flawless.
- After grouting, wipe tiles with a damp sponge to remove haze.
- Apply silicone caulk at corners and joints to seal gaps and prevent moisture intrusion.
- Allow grout to cure fully before exposing it to water or heavy use.
- Inspect your work for any uneven grout lines or tile shifts and carefully correct them.
Knowing how to properly finish your backsplash will make your work look professional and help maintain it for years to come.
To wrap up
With these considerations in mind, you can confidently enhance your kitchen by installing a backsplash that combines style and protection. By carefully planning your layout and using the right materials and tools, you’ll achieve a professional finish that suits your space and budget. If you want to dive deeper into the process and refine your technique, check out How to Install Tile Backsplash Like a Pro for expert guidance tailored to your project.